A guide: How to get your content ready for a website project

Failing to prepare your content? Prepare for your new website to fail!
Ok, it’s not all doom and gloom, but preparing your content alongside a shiny new website redesign and build is one of the most important things that you’ll have to do to help ensure your website project is a success.
From knowing what content should be transferred, to how content will be generated, or even how it should be structured? Content is reliably the stumbling block on which speedy website launches fall.
Content is the biggest element of your website. Quality content will help your audience understand what you do as a company and why they should care. Content across your website should educate, engage, and delight the user, eventually helping them take action and converting them into customers of your B2B product or service. Content creation should be at the top of your priorities list if you’re investing in a new website – or even if you’re managing an old one.
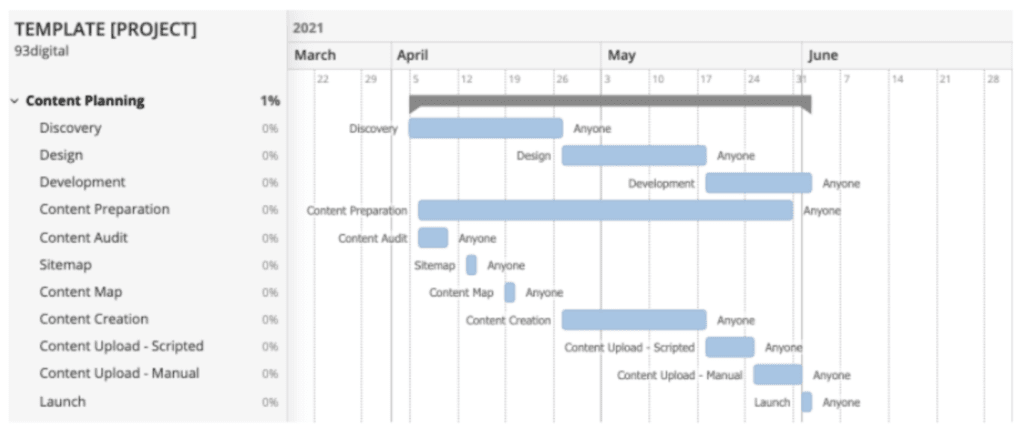
To ensure this is a success, marketing teams embarking on a website project need to understand that the preparation, creation and upload of content is a process which begins at the discovery phase, and doesn’t end until launch day (or ever if you’re implementing a marketing strategy).
We know it’s no easy task, but here is a step-by-step plan on how to efficiently create a content migration plan that will support the success of your website project.
Step one: audit your content
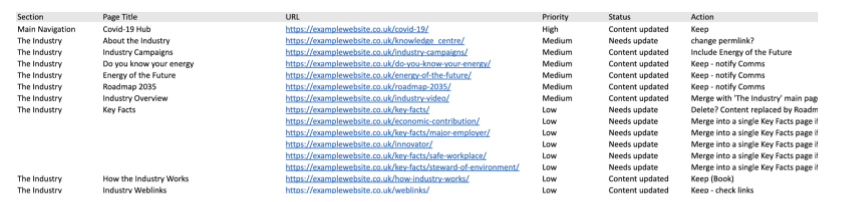
The first step of your process should be to complete a content audit. Now, this can be as basic or complicated you like, but it is a necessity. To do this you will need access to a tool like screaming frog or SEMrush to do a full scrape of the site. If it’s a smaller site your standard xml sitemap should be able to help.
Once you’ve gotten an export of all your pages/posts etc. it’s time to get reviewing. When auditing the content remember to:
- Check the data: what are users interacting with most? To understand this you can check Google Analytics to see what performs best, has the most views, longest time on pages, repeat visitors etc
- Assess your content: and ask yourself, is all your content in-date? If you’re looking at blogs/resources etc. are there any elements which you should look at updating?
- Create an action point: for each page in your spreadsheet consider if it needs to be updated, amalgamated with other pages, removed, tidied up, or generally optimised
Once you’ve gotten that together you’ll be in a good position to know what your content currently looks like and where you want it to be.
As you and your chosen web agency go through the discovery phase, completing a content audit and sticking to a content plan will arm you with a big chunk of the information you need to ensure your website is prioritised for the best user experience.
Step two: preparing your content
You’ve got your content audit plan, your sitemap and your content map.
What next?
Get working on your action points for your content! At this stage you should have a very clear idea of what you need to do to prepare your content.
We believe that content should lead design. Once your sitemap, content map and wireframes (or even before wireframe stage if you’re able!) are underway we would always say that once you’ve got the content map/wireframes approved you should begin writing up that content immediately.
Using the content map and wireframes as your guide to generate the content for your new website and always keep in mind the user and their needs.
Step three: collecting your content
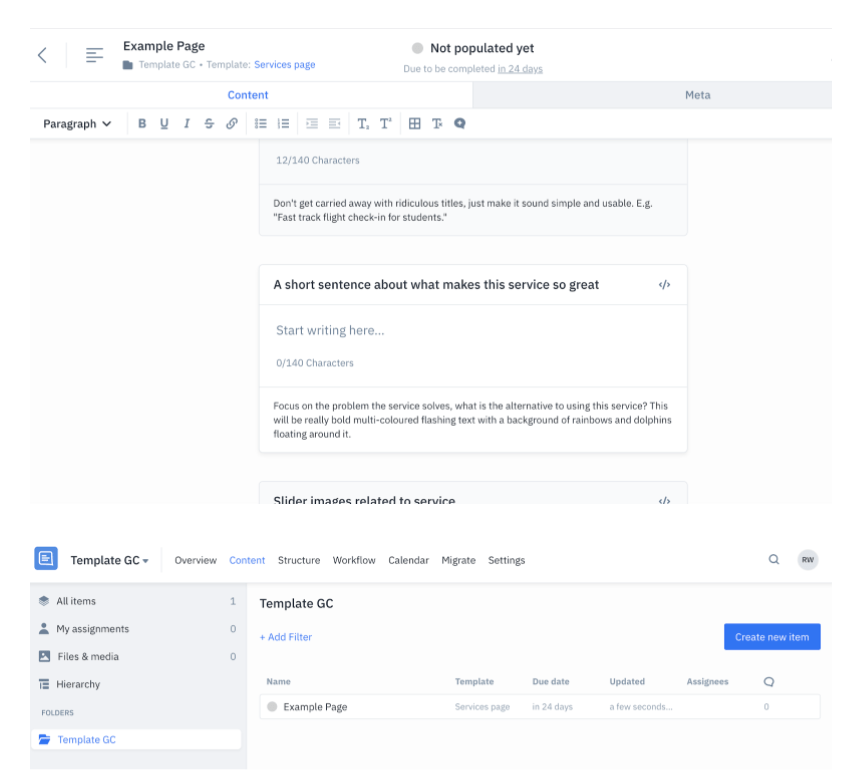
Regardless of whether you, or your chosen agency, will be uploading your content it’s important to save your new content in a consistent manner.
We use GatherContent – https://gathercontent.com/ – to set up our pages templates. This ensures that the content which is provided follows the approved wireframes, (meaning no nasty surprises when it comes to content upload!) meets requirements for SEO (providing upload for meta details) and can also manage your review process.
But, whatever works for you and your team is fine – as long as it’s consistent, clear and has responsibilities and delivery dates included. Google docs and Microsoft word can help you achieve a similar result!
Step four: uploading your content
You’ve been working hard on your content, you’ve honed it in line with your wireframes and designs, and collected it in a consistent manner. Now you’re waiting to get the site and populate it!
Generally speaking there are a number of routes to getting your content into the website. You can find all of the different ways we do content migration into WordPress here, but the manual and scripted content migration are as follows:
Manual Content Migration
Manual content migration requires your team, or you web agency/content agency, to go through the new website and upload content. If you’re doing this yourself, do ensure that you’ve allowed yourself sufficient time to complete the task. It does take time to upload your content, and I would recommend uploading content only after it’s gone through your own internal approval process.
Some tips on uploading content:
- Set aside dedicated time to complete this – there’s little chance you’ll get it done in time without this
- If using WordPress install a page duplicating plugin. This allows you to duplicate your pages and swap out content, especially useful if you’ve got a lot of bespoke Gutenberg blocks
- Get to know your blocks and post types before jumping into the upload. Knowing how your system works means you can assess what the best process for upload would be. For example, if your site includes lots of blog posts which are referenced in page content – make sure you add your blog posts first so when you get to adding your pages everything you need to reference in them is ready to go!
- Many hands make light work – as long as your content has been created consistently and the other team members have had training on how to add content, then there should be no problem in sharing this work. Just be clear who is adding which elements!
- Have all your content ready, including images and meta data – there’s nothing more frustrating than having to re-go through content you’ve already added to include small elements!
Scripted Content Migration
If you’ve got a lot of content which you need moving from one site to another, it may be worth reaching out to a web agency to see how they can help with a scripted content migration.
The remit of what is achievable within a scripted or automated content migration has a lot of variables but generally content which take a consistent structure, for example, blog posts, resource posts, etc are simpler to migrate en masse.
However, from “lift and shifts” to more complex content mapping processes there will likely be a scripted content migration process available for your site.
Good items for a scripted content migration would be content of which there is a larger volume, but all following a similar structure:
- Blog Posts
- Press Releases
- Resources
- Testimonials
- Vacancies
- Products
So, there it is, a very quick guide to getting your content ready for a website project. Try not to feel overwhelmed – it is a big job – but by breaking down the steps, working logically and setting responsibilities you will be able to manage the process and get your new website up and running as smoothly as possible.
Useful links:
- GatherContent: 13 content questions to kickstart your website redesign project.
- SEMrush: how to conduct a content audit with marketing strategy right at it’s heart.
- Crawl Budget’s and SEO tips for implementing redirects here.
- Why Content should lead design?
How to set up two factor authentication (2FA) on your WordPress site?

ABM tools for a B2B marketing strategy
Let's Talk
Do you have a web design and build project coming up that you would like to talk about?